
Replicating Hedge Fund Strategies with Four Options Trades
Part 92 — Risk reversals as momentum, covered calls as vol selling, collars as tail hedging, and why convexity is the only free lunch left

This is part 92 of my series — Building & Scaling Algorithmic Trading Strategies
Part 2 of the Synthetic Replication series. Part 1: Put-call parity and the building blocks.
Hedge Funds Are Just Payoff Shapes
Strip away the marketing and the 2-and-20 fee structure, and every hedge fund strategy is a payoff shape. Trend following produces convex returns — small losses, occasional large gains. Covered call funds produce concave returns — steady income, occasional large losses. Tail risk funds produce extreme convexity — constant small premium drain, massive gain in crashes.
You can replicate any of these shapes with the four building blocks from Part 1. This doesn’t mean you can replicate the skill of a good hedge fund manager — timing, security selection, and risk management still matter. But you can replicate the structure, and the structure explains most of the return characteristics.
Strategy 1: Risk Reversal as Synthetic Momentum
A risk reversal — long an OTM call, short an OTM put at the same expiry — creates a zero-cost (or near-zero-cost) directional bet with unlimited upside and significant downside.
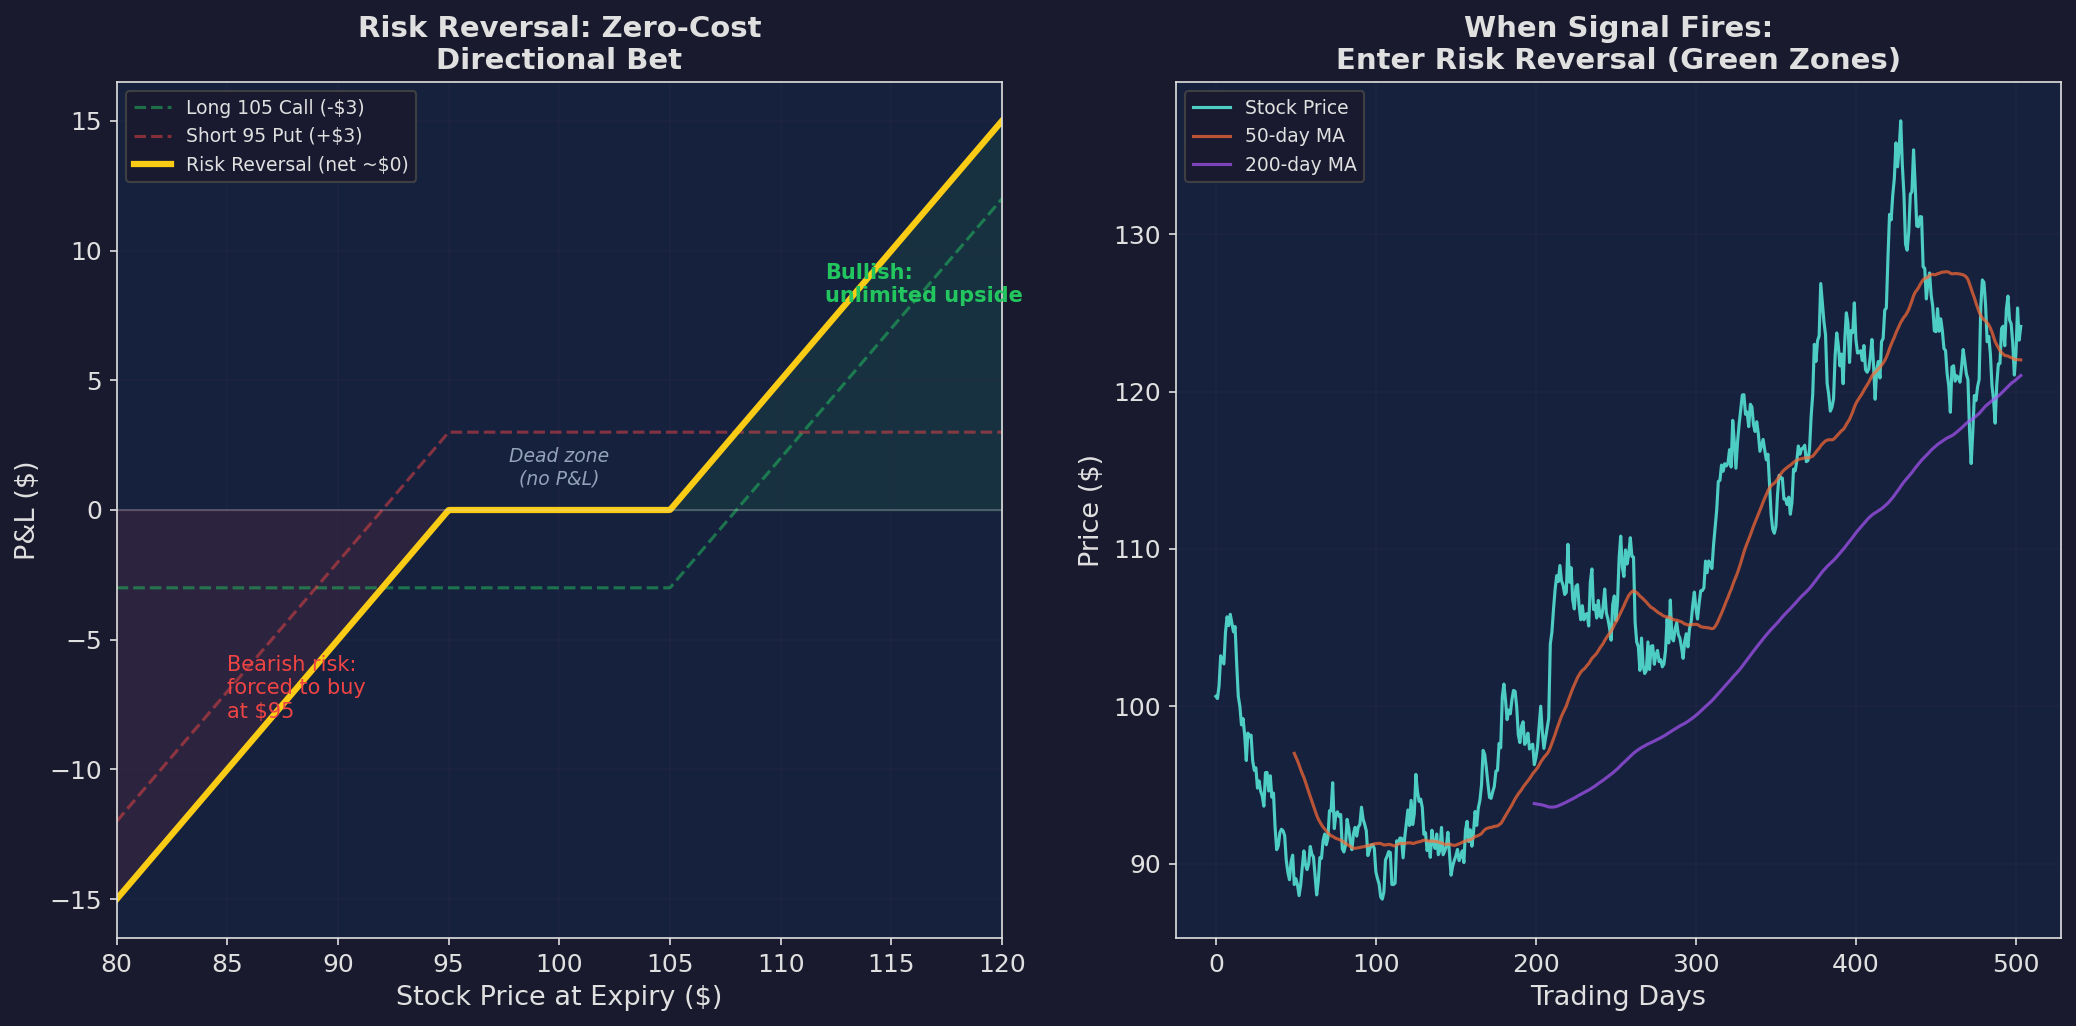
Left: the risk reversal payoff. Long the 105 call, short the 95 put, for approximately zero net premium. If the stock rallies past 105, you participate fully. If it drops below 95, you’re obligated to buy at 95 — taking losses as if you owned the stock. The “dead zone” between 95 and 105 is where nothing happens. Right: when a momentum signal fires (50-day MA crosses above 200-day), you enter the risk reversal instead of buying stock.
Why This Replicates Momentum
A momentum strategy says: “I think the stock will continue its recent trend.” A risk reversal says exactly the same thing with different capital characteristics:
Stock purchase: $10,000 capital for 100 deltas. Linear exposure. Full downside.
Risk reversal: ~$0 net premium for ~50 deltas initially (grows toward 100 if the stock rallies). Defined dead zone. Full downside below the put strike.
The risk reversal gives you leverage without margin. You get directional exposure at a fraction of the capital, and the OTM call gives you positive convexity — your gains accelerate as the stock moves in your favor because the call’s delta increases.
The trade-off: the dead zone. If the stock moves modestly (stays between 95 and 105), the risk reversal returns approximately nothing. The stock purchase returns whatever the stock does. For momentum signals that predict large moves, the dead zone is a feature — you avoid paying up for small, uncertain moves. For signals that predict small, consistent moves, the dead zone kills you.
When to Use It
Risk reversals work best when:
Your momentum signal has high conviction but low frequency (a few signals per year)
You want exposure without committing full capital
You’re willing to accept the short put obligation as “buying the dip” if wrong
Strategy 2: Covered Call as Systematic Vol Selling
The covered call — own the stock, sell an OTM call — is the most popular retail options strategy. It’s also a misunderstood one. Most people think they’re “generating income from their stock.” What they’re actually doing is selling volatility.
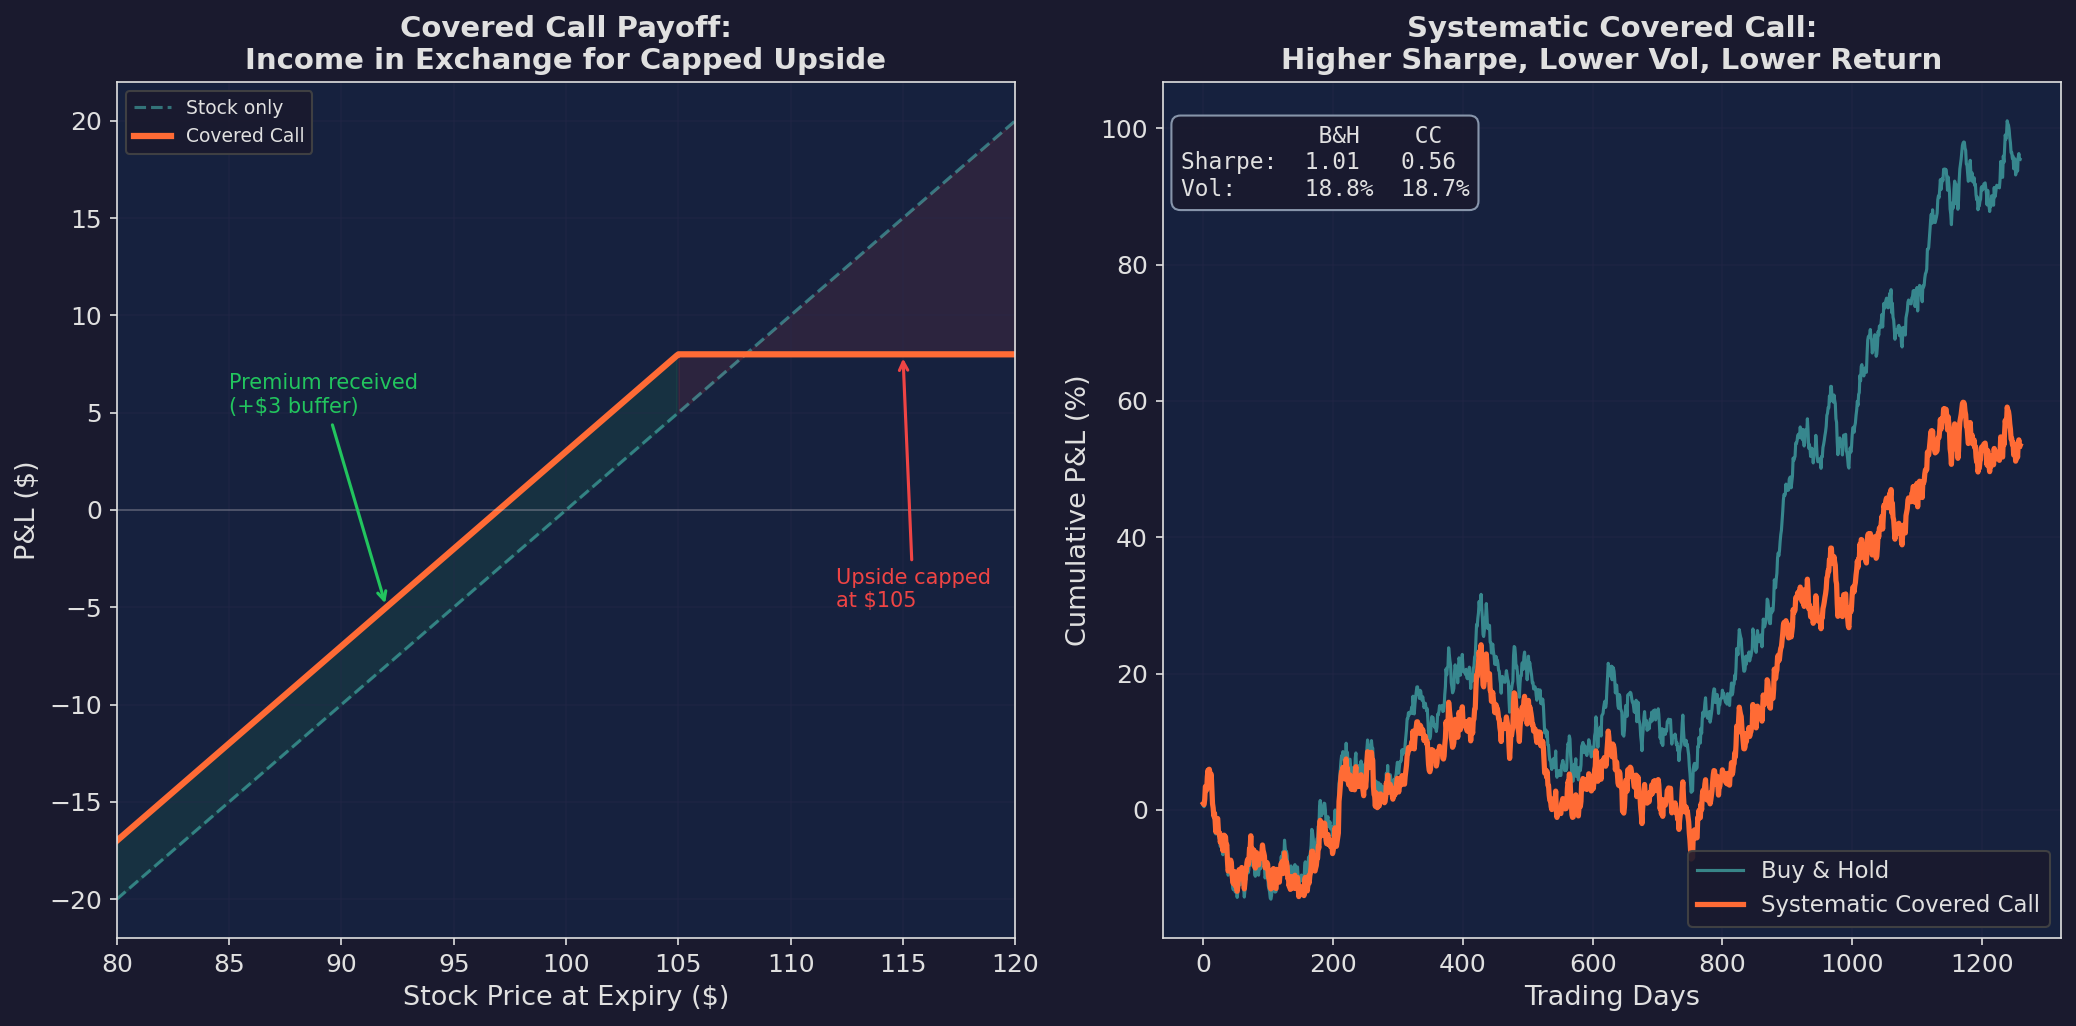
Left: the covered call payoff. You participate in gains up to the 105 strike, then give up additional upside. The premium ($3) provides a small buffer against losses. Right: systematic covered call writing vs. buy-and-hold over 5 years. The covered call has higher Sharpe and lower vol, but lower total return — you’ve traded upside for income.
The Vol Selling Connection
When you sell a call against your stock, you’re implicitly saying: “I believe realized vol will be less than implied vol over this period.” If the stock doesn’t move much (low realized vol), you keep the premium. If it moves a lot (high realized vol), the sold call costs you in either direction — you miss the upside, or the premium doesn’t cover the downside.
This is the same trade as the volatility risk premium we discussed in Part 87 (Carry series). The covered call is carry. The premium you collect each month is the “income” component, and the capped upside is the price of that income.
When to Use It
Covered calls work best when:
You’re holding the stock anyway and want income
Implied vol is elevated relative to your expected realized vol
You have a target sell price (the strike is your “limit order with a bonus”)
Covered calls work worst when:
The stock is in a strong trend (you cap your participation)
IV is low (the premium isn’t worth the opportunity cost)
Strategy 3: Collar as Tail Hedge
The collar — own the stock, buy an OTM put, sell an OTM call — truncates both tails of your return distribution. It’s the simplest implementation of tail hedging.
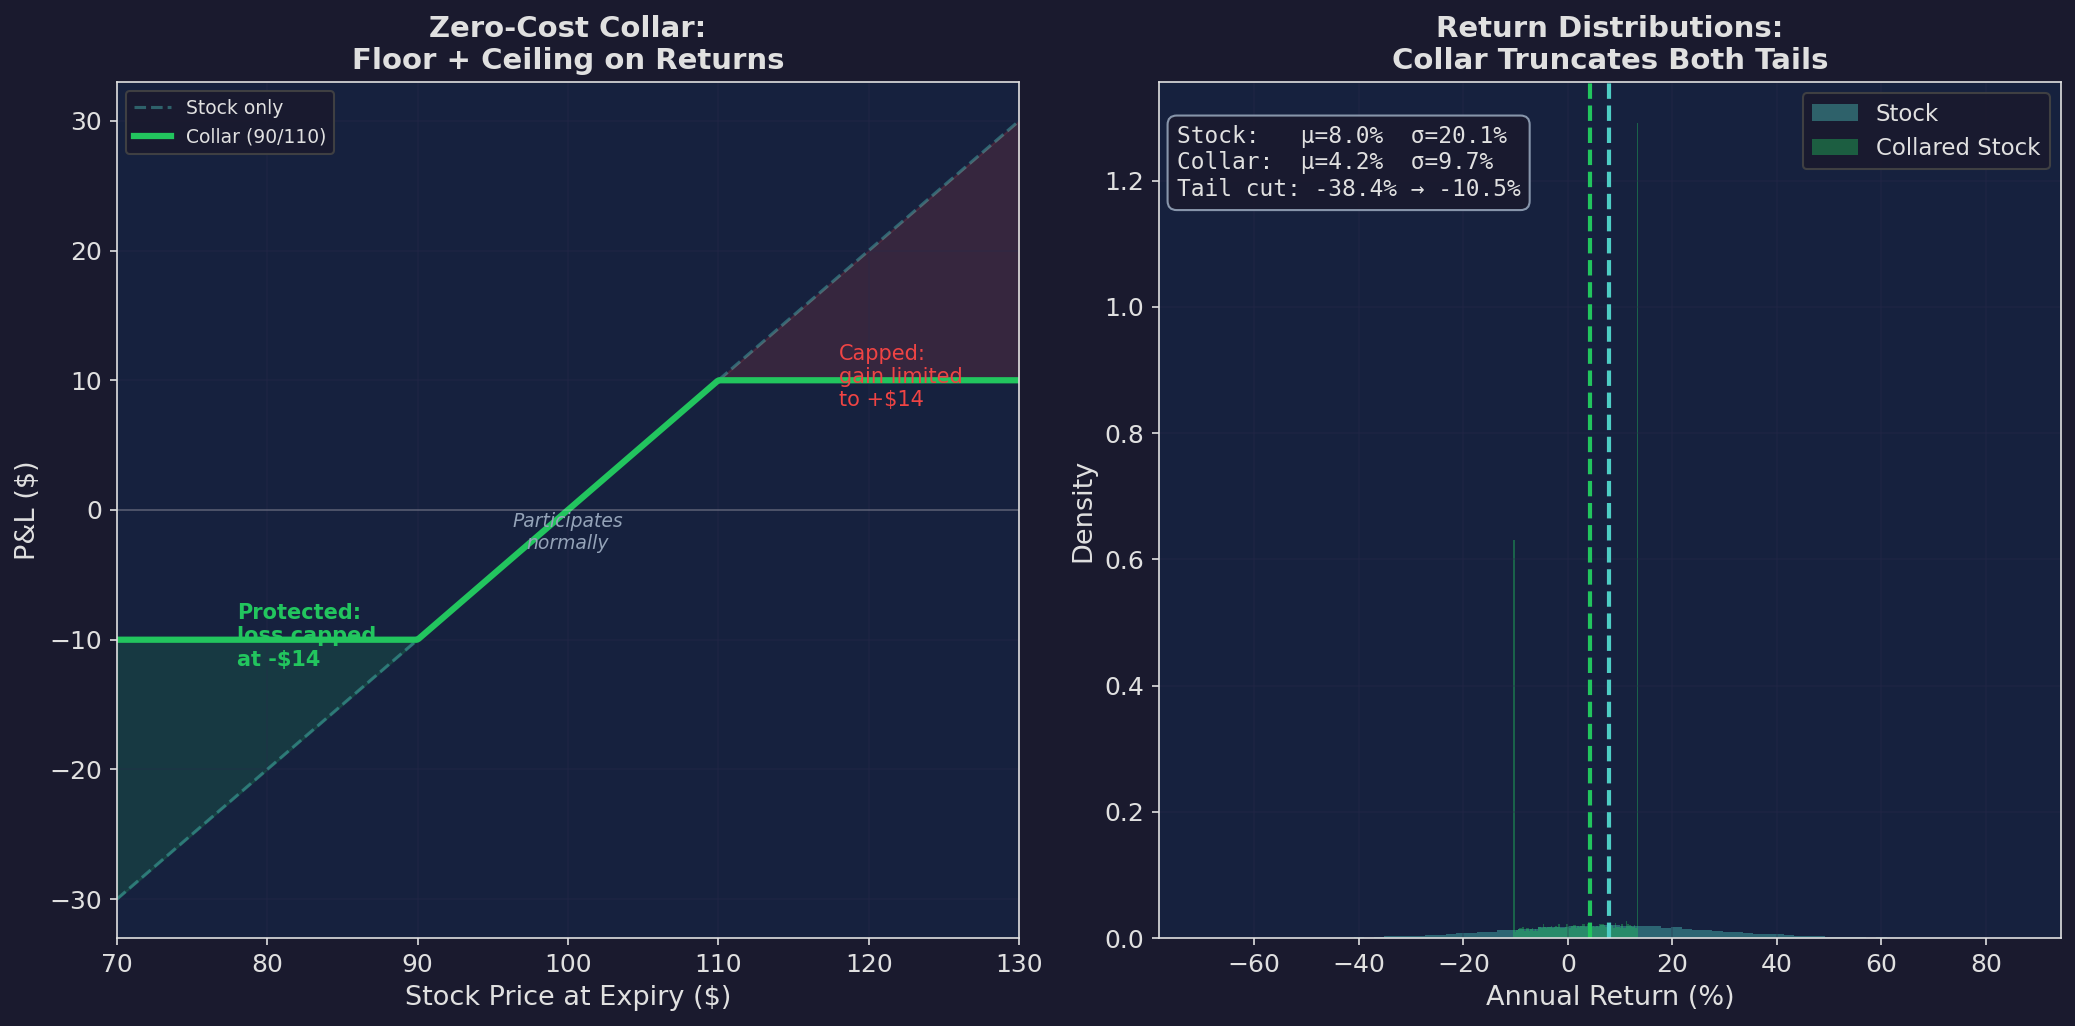
Left: the 90/110 collar payoff. You participate between 90 and 110, with losses floored at -$14 and gains capped at +$14. If the put and call premiums offset, it’s zero cost. Right: the return distribution shifts — both the left tail (crashes) and right tail (rallies) are truncated.
The Put Spread Collar: A More Practical Version
The plain collar is expensive because the OTM put costs more than the OTM call provides (skew — puts are more expensive than calls at equal distance from ATM). A more capital-efficient version uses a put spread instead of a standalone put:
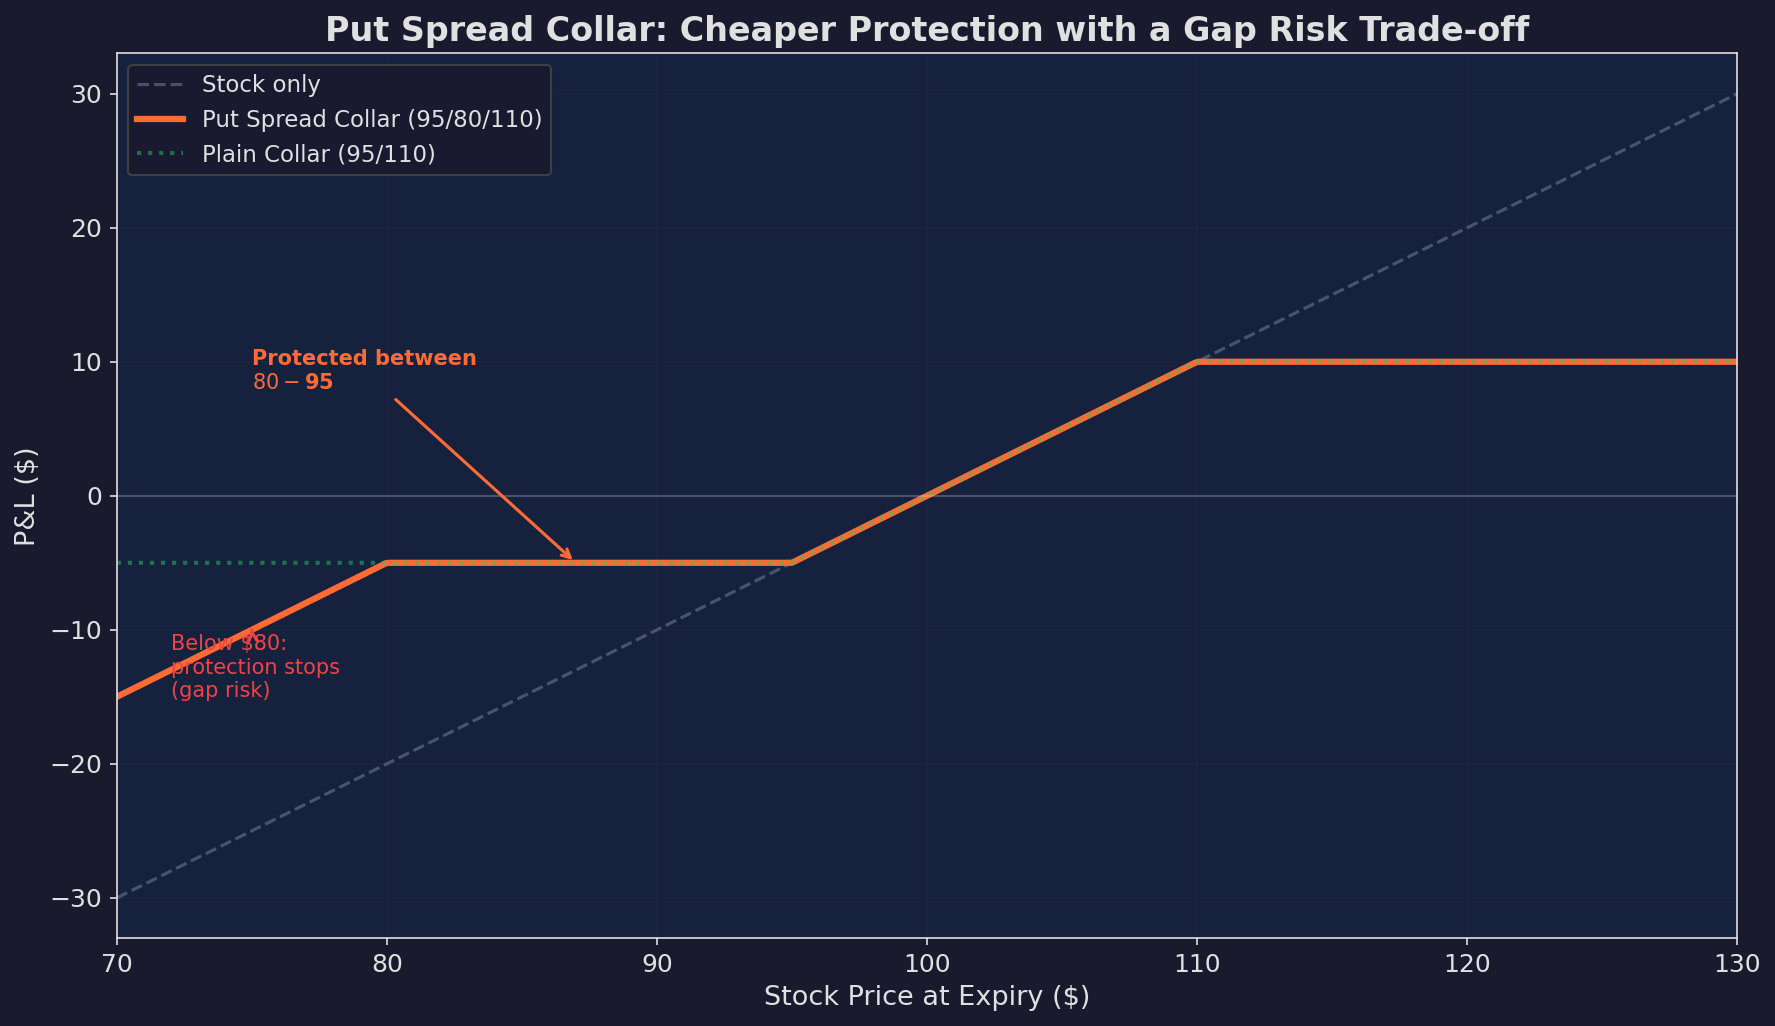
The put spread collar: long the 95 put, short the 80 put, short the 110 call. Cheaper than the plain collar because selling the 80 put funds part of the 95 put. The trade-off: protection stops at $80. Below that, you’re exposed again. This is the “defined-range protection” approach — cheaper, but with a gap risk if the crash exceeds your protective range.
When to Use It
Collars work best when:
You have a concentrated stock position you can’t or don’t want to sell (tax, vesting)
You want to define your risk range for a specific period (earnings, macro event)
You’re willing to trade upside for peace of mind
Strategy 4: Iron Condor as Defined-Risk Vol Selling
The iron condor — sell an OTM put, buy a further OTM put, sell an OTM call, buy a further OTM call — is the defined-risk version of vol selling. It profits when the stock stays within a range.
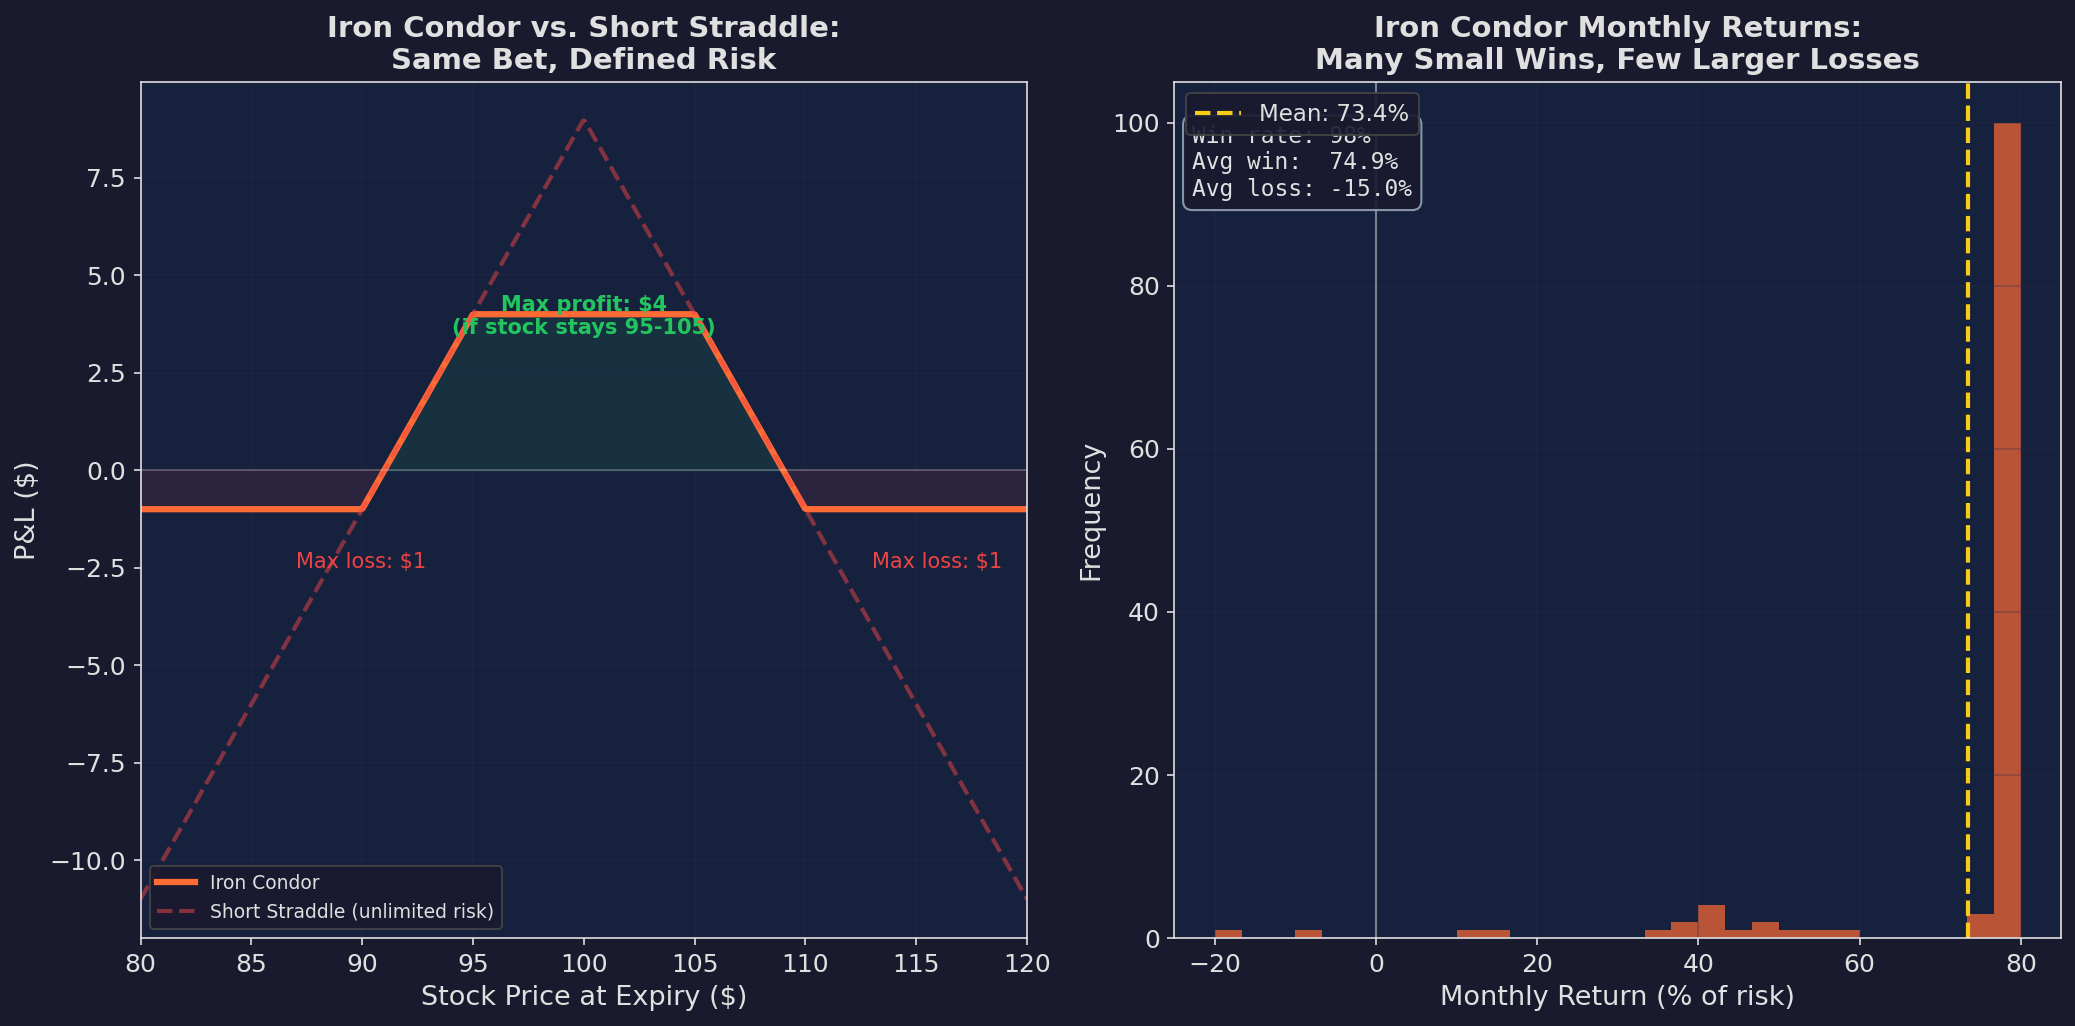
Left: the iron condor payoff vs. the short straddle. Same bet (stock stays flat) but the iron condor has a defined maximum loss of $1 vs. the straddle’s unlimited risk. Right: monthly iron condor return distribution. High win rate (~75%), small average win, larger average loss. Classic carry profile.
The iron condor is the retail-accessible version of what systematic vol selling funds do. It captures the volatility risk premium with defined risk — you know your maximum loss before entering the trade.
The return distribution tells the full story: many months of small wins, punctuated by fewer but larger losses. This is the carry profile from Part 87, expressed through options instead of interest rates or credit spreads.
The Rosetta Stone: Strategy → Options

Every hedge fund archetype maps to an options construction. The mapping isn’t perfect — a Renaissance Technologies quant is doing more than selling iron condors — but the payoff structure is replicable.
The deeper insight: by choosing your options construction, you’re choosing where you sit on the convexity spectrum.
Convexity: The Only Free Lunch Left
The most important concept in this post — arguably in the entire series — is convexity: the curvature of your payoff relative to the market.
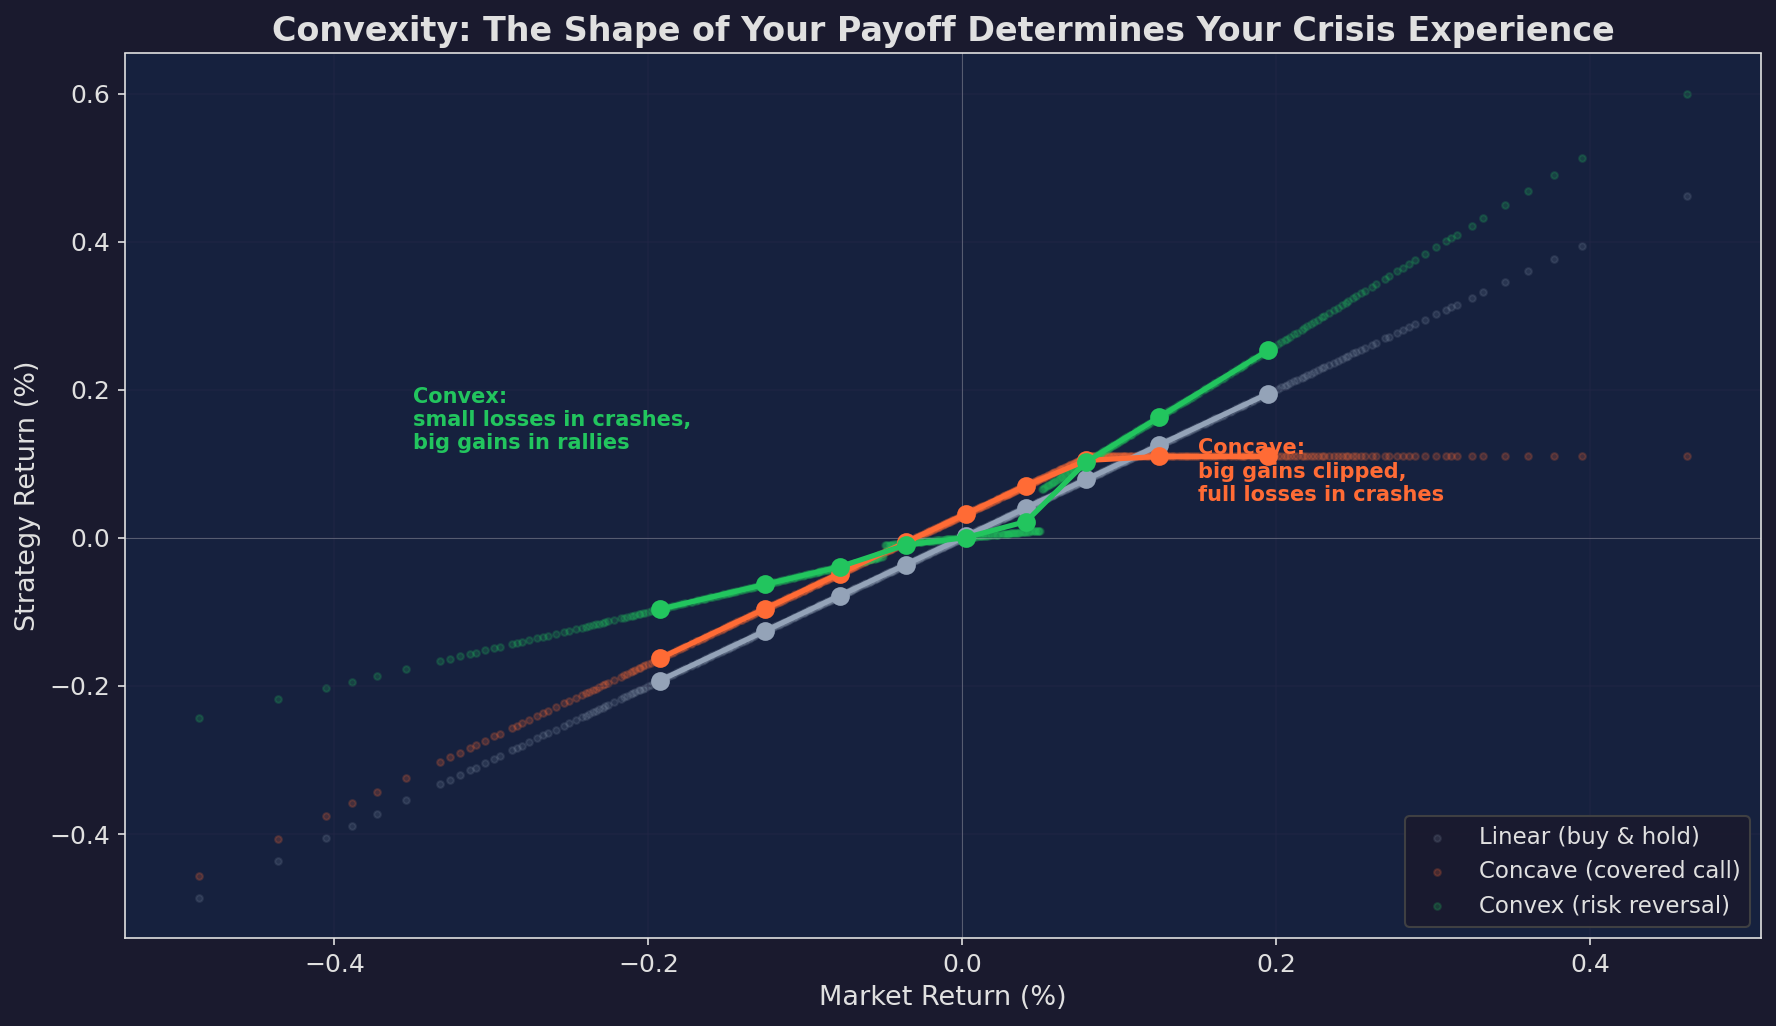
Three strategies plotted against market returns. Gray: linear (buy & hold) — you get whatever the market gives you. Orange: concave (covered call) — you do better than the market in small moves but worse in large moves, especially on the upside. Green: convex (risk reversal / trend following) — you do worse in small moves but better in large moves, especially preserving capital in crashes.
The key:
Concave strategies (covered calls, short straddles, credit spreads) earn steady income in normal markets but get destroyed in tail events. They’re selling insurance.
Convex strategies (long options, trend following, risk reversals) bleed slowly in normal markets but profit from large moves. They’re buying insurance.
Neither is inherently better. The question is which one fits your strategy’s risk profile.
For V6 specifically: V6 has embedded convexity from its momentum signals — it exits before large drawdowns complete. But it also has embedded concavity from the VRP carry component. Understanding this mix is what Part 4 will address when we design the options overlay.
The Concavity Trap
A warning: most retail options strategies are concave. Covered calls, credit spreads, iron condors, cash-secured puts — they all have the same profile: steady income, occasional large loss. They feel great 80% of the time and terrible the other 20%.
The danger isn’t the strategy itself — it’s the psychology. When you’ve collected 10 months of premium, the 11th month’s -15% drawdown feels like a “freak event” rather than the expected cost of doing business. The premium you collected over 10 months was compensation for this event. If you didn’t earn enough premium to cover it, you were underpaid for the risk.
Before implementing any concave strategy, calculate your expected loss-to-premium ratio:
Expected loss frequency × Average loss size ÷
Annual premium collected

If this ratio > 0.8, the strategy isn't earning enough
premium to justify the risk.
Up Next
Part 3: Vol Surface Arbitrage — When the implied vol at different strikes and expirations is “wrong,” how do you express a view on skew, term structure, or convexity? The math of the volatility surface and where the opportunities live.
Remember: Alpha is never guaranteed. And the backtest is a liar until proven otherwise.
These posts are about methodology, not recommendations. If you find errors in my math, let me know — I’ve built an entire series around discovering my own mistakes, so one more won’t hurt.
The material presented in Math & Markets is for informational purposes only. It does not constitute investment or financial advice.
Great explanations of these strategies. Thanks for sharing.